Dropcam Build Guide
Open-source underwater survey camera — 3D printed, GPS-tracked, and built for community-led marine biosecurity monitoring in Aotearoa.
What is the Dropcam?
The Dropcam is a low-cost, 3D-printed underwater camera housing designed for drop-down video surveys. Paired with a consumer action camera that supports a live timestamp watermark and a GPS-enabled phone, it gives community groups, hapū, volunteers, and researchers a practical tool for monitoring seabed health and detecting invasive species like Caulerpa.
Once footage is captured, the Dropcam Telemetry Viewer web app synchronises video with GPS tracks, lets you mark sightings, and generates validated survey reports for submission to regional councils and biosecurity agencies.
The dropcam is just one way to gather footage. The viewer works with any method — a diver with a surface buoy carrying the GPS, a towcam, or a pole camera from a wharf. As long as you have synced video and GPS with matching timestamps, it can process it.
Assembled Dropcam
3D Model
Explore the Dropcam housing in 3D. Drag to rotate, scroll to zoom, right-click to pan.
Versions
Dropcam v1
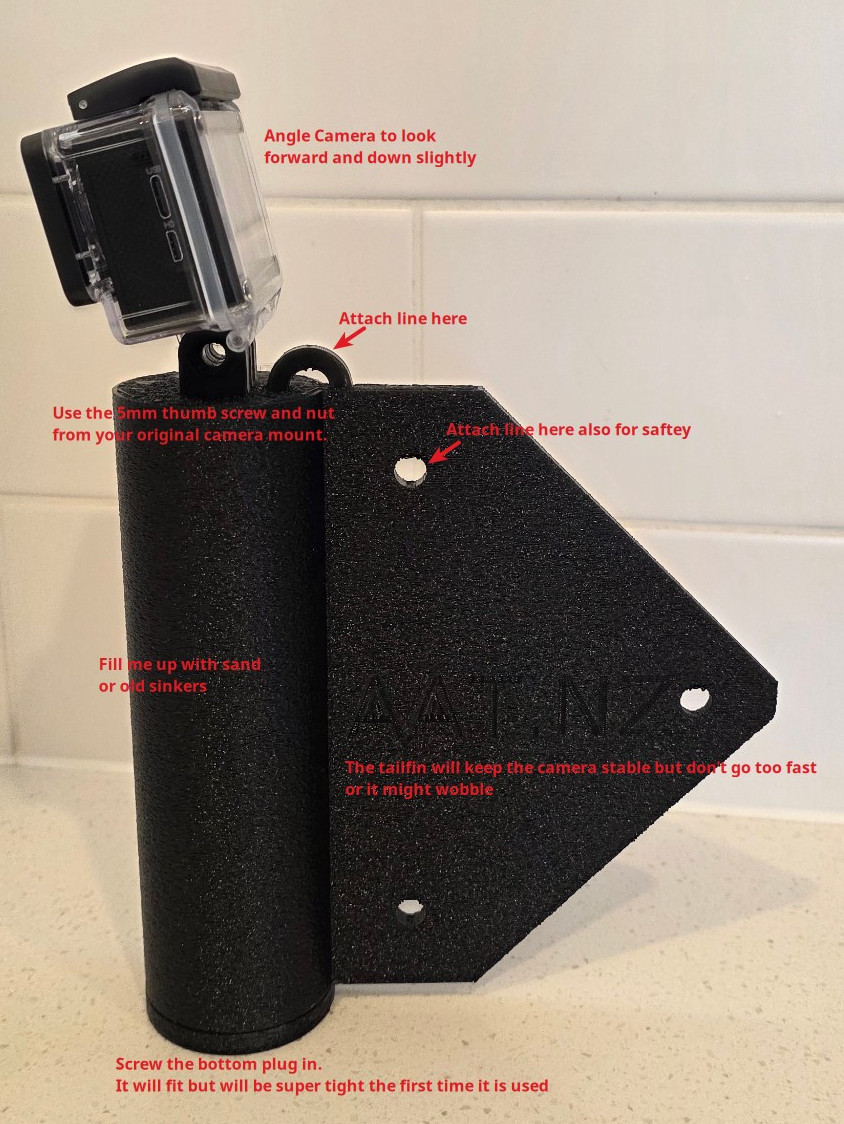
The original 3D-printed drop camera housing. Fits most compact action cameras (GoPro, DJI Action, SJCam, etc). Any camera with a live timestamp watermark, the GoPro-style 2-prong mount, and a waterproof case rated to 20 m will work. Single-piece body with screw-in ballast mounts and a tether attachment point.
Additional versions and camera-specific mounts are planned. Check back for updates.
Parts List
| Component | Details | Notes |
|---|---|---|
| 3D-printed housing | PLA or PETG, ~200g filament | Print from the STL above |
| Action camera | GoPro, DJI Action, SJCam, or similar | Must support a live timestamp watermark on the video; any camera with a GoPro-style 2-prong mount and 20 m waterproof case works |
| Ballast weights | Lead or sand, ~200–500g | Adjust for max negative buoyancy |
| Tether line | Heavier braid or nylon on a handline or reel, 15–30m | Use gloves with braid |
Build Steps
Step 1 — Print the housing
Download the STL file and slice it with your preferred slicer (PrusaSlicer, Orca, Superslicer, etc). Use PETG for better water resistance or PLA for faster prototyping. Print standing up. You will need to separate the parts to individual objects before printing. Recommended settings: 0.2 mm layer height, 30%+ infill, 3 perimeters.
Step 2 — Insert ballast
Insert the ballast weights or sand into the base and aim for as much negative buoyancy as possible. This will help stabilise the camera and help it stay below you as you move. Test in a bucket before going to sea.
Step 3 — Mount the camera
Secure your action camera in the housing. Ensure the lens is centred in the viewport and the camera is oriented correctly (lens facing slightly down and forward).
Step 4 — Rig the tether
Attach the tether line to the top mount point. Use a favourite knot, spider hitch, loop or granny knot. Braid should have a nylon leader attached first. Mark depth intervals on the line with tape or whipping for quick reference during deployment. Ideally use a handline. If you use a boat rod it needs to be shorter and as rigid as possible.
Step 5 — Deploy
Start recording, start your GPS tracker, and lower the dropcam to the seabed. Drift slowly along your transect — the dropcam is not a towcam and doesn't have the lighting or stability needed for faster travel. When you review the footage you will appreciate slower, more gentle movements. Try to stay as close to the bottom as practical. When finished, retrieve the camera and load your footage into the Telemetry Viewer for processing.