Instructions & Guide
A community tool for underwater survey, sighting documentation, and marine biosecurity reporting — built for the protection of Aotearoa's coastal waters.
System Overview
The Dropcam Survey System has three parts:
- A 3D-printed dropcam housing — the STL file is available for download from the viewer's front page.
- An action camera — GoPro, DJI Action, SJCam, or similar. The camera must be able to display a live timestamp watermark on the recorded video — this is how we sync footage to GPS. Anything with the GoPro-style 2-prong mount in a waterproof case rated to 20 m will work.
- Two apps used as part of the workflow:
- Geo Tracker — used during the survey to record your GPS track.
- Dropcam Telemetry Viewer (dropcam.aat.nz) — used after the survey to synchronise footage, mark sightings, and submit reports.
The workflow is simple: record video underwater, record your movement with GPS, then synchronise and review both together later. Desktop/laptop is still best for detailed review, while phone/tablet mode supports field map use, live position, recorded-track sharing, and loading shared surveys.
Printing the Dropcam Housing
The dropcam housing is 3D-printed and designed to hold a standard action camera in its own waterproof case. Schools, libraries, and makerspaces are perfect places to get access to a printer if you don't have one.
What You'll Need
- A 3D printer with PLA or PETG filament
- The
.stlfile (download from the viewer header)
Print Settings
| Setting | Value |
|---|---|
| Material | PLA or PETG |
| Nozzle | 0.4 mm |
| Layer height | 0.3 mm |
| Infill | 35% |
| Orientation | Print standing upright |
| Parts | Main body and bottom screw printed separately |
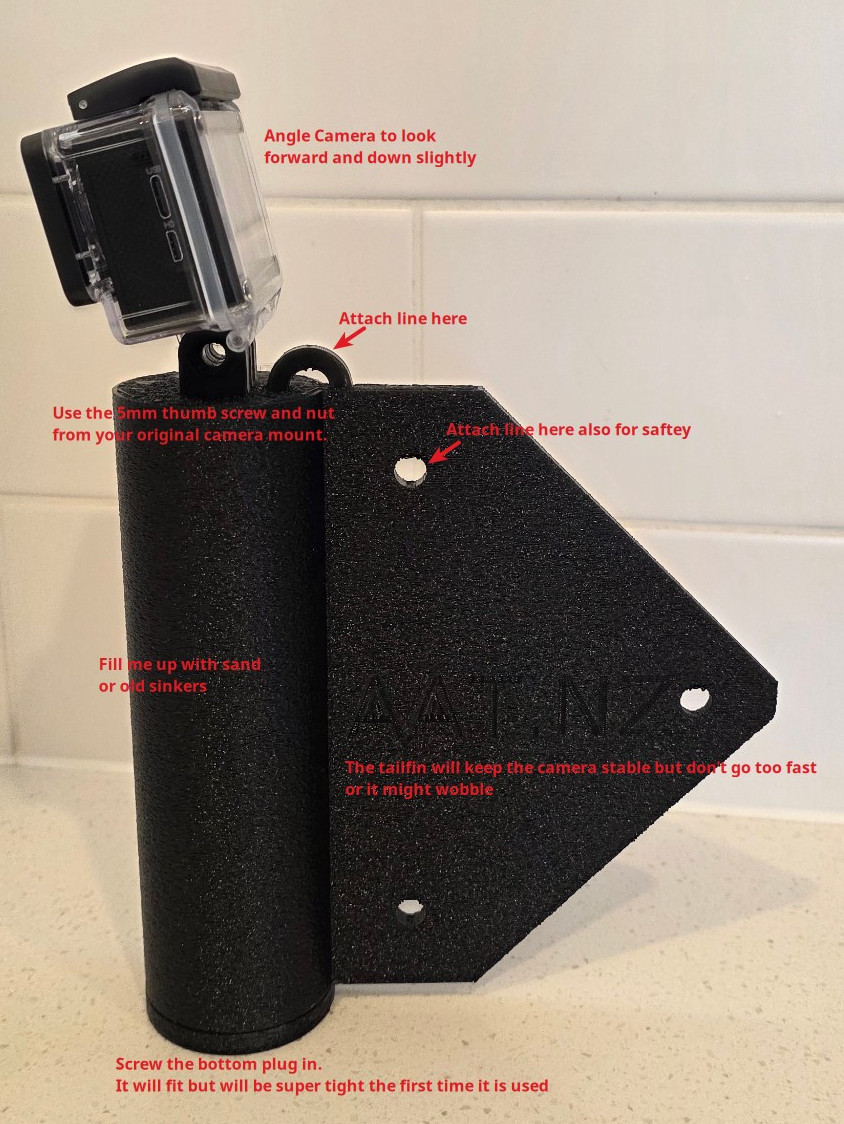
The dropcam housing with an action camera fitted — sinkers sit inside the cylindrical section.
Preparing the Dropcam
The dropcam needs to sink steadily and stay vertical. Place old fishing sinkers inside the cylindrical section of the housing to achieve this. Tie your main line to the top attachment point and run a safety loop through the hole in the fin — this prevents accidental loss if something comes loose.
Before your first survey, test the fully assembled dropcam in a bucket or shallow water. Confirm it sinks smoothly, stays upright, and doesn't leak.
Camera Setup
The housing fits GoPro, DJI Action, and SJCam-sized action cameras — any camera with the GoPro-style 2-prong mount in a waterproof case rated to 20 m will work. The key requirement is that the camera must support a live timestamp watermark burnt into the video — this is how we sync footage to your GPS track. Most default camera presets are fine beyond that — resolution and frame rate aren't critical.
Before heading out, fully charge the camera, make sure you have enough storage for continuous video, and give the lens a good clean.
Using the Dropcam
A hand line works best, though a short stiff boat rod is also fine. Braid or nylon — either will do. Avoid long, flexible rods as they make control harder.
- Before dropping the camera in the water, do a slow pan around the area. That extra footage is useful later when reviewing and confirming location.
- Take a short video of your phone screen and make sure the time, especially the seconds, is clearly visible. This gives you a solid cross-check when syncing the video during review. Thanks Matt from MPI for that one.
- Try to stay at around 0.5 km/h. Once you move much faster, the footage becomes harder to review properly.
- DJI footage can be useful for aerial surveys, especially along coastlines.
- The system also works well for diver and snorkeller surveys where the diver records the video and the mobile phone or GPS recording stays in a float boat directly above them.
- Shoreline surveys above water can also be recorded in the same system for logging sightings.
How to Deploy
- Lower the dropcam slowly and steadily — avoid swinging.
- Touch the seabed gently so you know the depth, then lift the camera about 1 m off the bottom.
- Try to maintain roughly 1 m altitude as you drift or move to the next position — about 1–2 minutes of travel.
- Touch the bottom briefly every 1–2 minutes just to confirm you're still close, then lift back up.
- Avoid repeatedly bouncing off the seabed — each hit shakes the camera and the footage wobbles so much you can't see anything useful during review.

Lowering the dropcam over the side — slow and steady gets the best footage.
Care & Maintenance
A little care after each use will keep your dropcam in good shape for years.
Rinsing After Use
Always rinse the dropcam thoroughly with fresh water after every outing — saltwater accelerates corrosion and can cause the screw base to seize. Pay attention to the threads, line attachment point, and any hardware. Let it dry fully before storing.
Weights Housing
Empty the sinkers out after each use and give the inside a good rinse. Sand is the main thing to clear out — it can carry contamination (including Caulerpa fragments), and wet sand trapped inside will smell quickly. Shake out every last bit, rinse thoroughly, and store dry with the sinkers removed. Salt water and grit left sitting inside will also degrade the plastic over time.
Checking for Wear
Before each outing, give the housing a quick once-over:
- Check the screw base threads for wear or cracks — this is the most stressed part of the housing.
- Look for cracks or stress fractures around the line attachment point and fin.
- Check where the camera mount interfaces with the housing — repeated insertion and removal can cause fatigue over time.
- Inspect anywhere the housing has taken an impact.
Repairs
Small cracks and splits are easy to fix before they become big ones:
- Handheld 3D extruder pen — the best option for PLA/PETG repairs. Run matching filament into the crack and smooth it while warm. Strong, flexible, and waterproof.
- 5-minute Araldite (epoxy) — good for structural repairs, especially around attachment points and threads. Mix and apply to a clean, dry surface.
- Superglue (cyanoacrylate) — ideal for fine cracks and hairline splits. Wick it into the crack, hold firmly for 60 seconds. Not recommended for load-bearing joints on its own.
If the housing is badly cracked or the screw thread has failed, it's easier to just print a new one — the STL is free and a replacement prints in a few hours.
Recording GPS
You'll need a GPS tracking app on your phone that can export GPX files. We reccomend starting your GPS recording before you begin filming.
Android
Geo Tracker is our recommendation — it's free from the Play Store, clean, reliable, and easy to use. This is the only GPS app we've tested with so far.
iPhone
Gaia GPS is a good free option from the App Store. Other apps like GPX Master, Footpath Route Planner, or MotionX-GPS should also work as long as they can export a GPX file, though these haven't been tested.
Recommended Settings
- Recording interval: 1 second
- Distance filter: 0.5 m
- All other defaults are fine
When to Start and Stop
If you're launching from a kayak, paddleboard, or beach — start recording before you launch and keep the phone in a dry bag. From a larger boat, start recording just before your first drop. Leave GPS running throughout your survey — multiple dropcam locations are fine.
The rule is simple: as long as GPS is recording while you're recording video, you're good. Multiple dropcam locations are fine — you can define your transects later in the app during the review.
After your survey, export the GPX file via email, cloud, or USB. You'll need it on a laptop or desktop later.
Using the Dropcam Telemetry Viewer
This is where everything comes together. Open the viewer in your web browser at dropcam.aat.nz — Chrome, Firefox, Edge, or Safari all work fine. No installation needed.
1. Load Your Files
Click or drag your video file into the video drop zone, and your GPX track into the GPX drop zone. If you recorded with a DJI drone, you can load an SRT file instead of a GPX — see below.
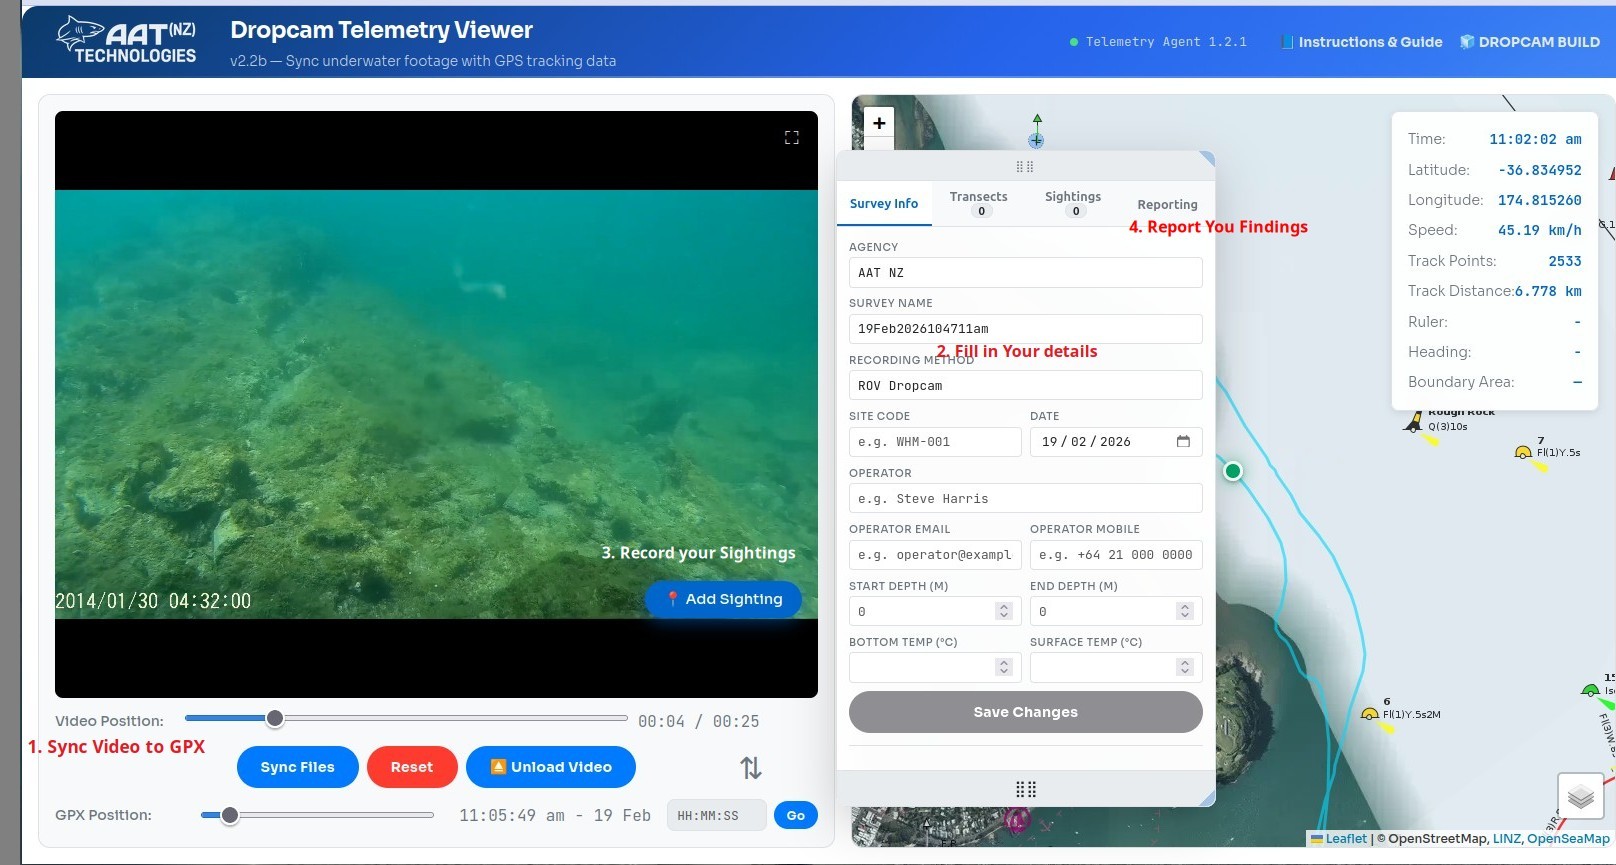
The viewer layout — video on the left, map on the right, sightings panel below.
DJI Drone SRT Import
If you recorded aerial footage with a DJI drone (e.g. DJI Mini), you can use the .SRT subtitle file the drone generates alongside every video as your telemetry source — no GPX required. DJI SRT files contain embedded GPS coordinates, altitude, and absolute timestamps for every frame.
To use it: drag or click the GPX drop zone and select your .srt file.
The viewer converts it to a GPS track automatically and syncs the video to the beginning of the flight — no manual sync step needed.
The track appears on the map and playback works exactly as it does with a GPX file.
.srt file with the same name as the video in the same folder on the SD card.
Copy both the video and the SRT file to your computer before loading them.
2. Sync Video with GPS
The key to accurate positioning is matching the clock visible in your video with the GPX track time. Scrub the video to a frame where you can clearly read the timestamp on screen. Then adjust the video start time field so that the GPX position time lines up with the clock shown in the footage. Once they match, click Sync & Play — your position marker on the map will now move in sync with the video.
If the position looks off, click Resync, adjust the time, and sync again.
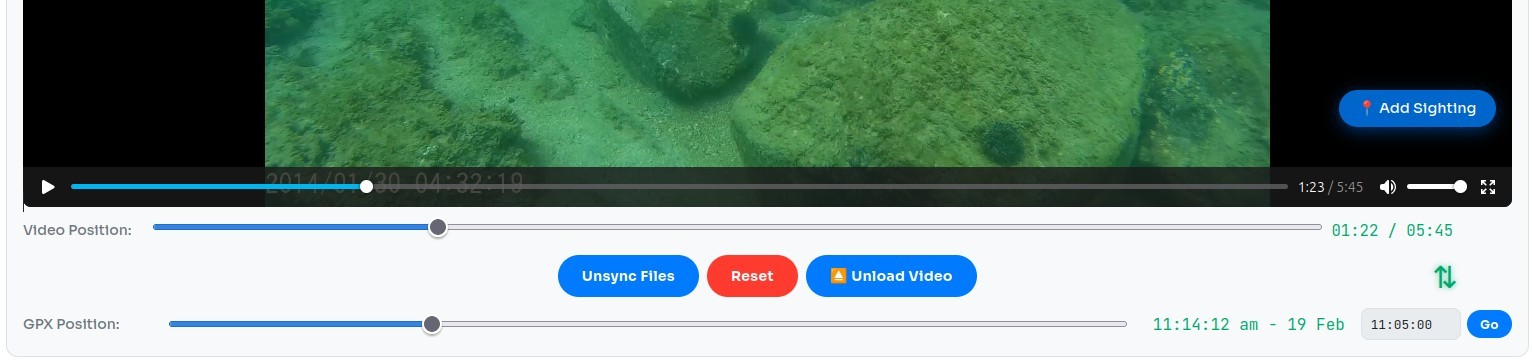
Match the clock in the video to the GPX time — then hit Sync & Play.
3. Add Transects (Optional)
You don't need to add transects — they're there if you want to define and measure specific survey lines as part of your work. Right-click the map or cursor and choose Start Transect, or use the panel button — the button turns green and the End button pulses. Move to the end point, right-click again, and choose End Transect (or click Set End in the panel). The map will show a red start triangle and a blue finish square for each transect, connected by a green line.
3a. Use Overlays for Planning & Repeat Surveys
The Overlays tab lets you load additional GPX tracks or saved survey ZIPs on top of your current survey. This is useful for transect planning, especially when you want to compare your intended run lines with previous work in the same area.
Overlays are also useful for repeat surveys. You can load historical survey GPX files and visually line them up with the current track so you can run the same area again with better consistency.
We also use overlays to compare changes at the same location over time, and to combine underwater and DJI aerial surveys in the same review session.
Each overlay has its own visibility, colour, opacity, notes, waypoints, sightings, ruler, and boundary areas. Named overlay boundaries appear on the map with smaller labels than the live survey labels, so older survey areas stay readable without overpowering the active work.
Use Make Active to promote a timestamped overlay into the active GPX. The previous active GPX is demoted into the overlay list, including its current waypoints, sightings, boundaries, ruler, and notes. If the previous active survey had no notes, the demoted overlay is labelled Demoted from active GPX; otherwise its existing comments are kept. The promoted overlay's notes become the active Survey Notes.
Overlay metadata is preserved in saved and shared survey ZIPs, so colours, visibility, opacity, notes, labels, and overlay GPX files reload the same way next time.
3b. Map Layers
The map includes several toggle-able overlay layers accessible from the layer control in the bottom-right corner. These help you understand the regulatory and environmental context of your survey area at a glance.
Restricted Zones
A unified overlay showing marine protection and restriction areas colour-coded by type:
- Blue — High Protection Areas (HPA)
- Green — Seafloor Protection Areas (SPA) and Benthic Protection Areas (BPA)
- Red — Marine Reserves
- Orange — Cable and Pipeline Protection Zones
Click any zone to see its name, legal reference, rules summary, and a link to official information. Hover over a zone to see its name as a tooltip.
CAN Boundaries
Controlled Area Notice zones for Caulerpa. Red zones are high-risk areas with strict restrictions. Yellow zones are controlled areas with modified rules. Sourced from MPI's public ArcGIS data and cross-referenced with the latest MPI caulerpa rules.
Rāhui / Closures
Temporary closures (s186A), rāhui tapu areas, and mātaitai reserves. These include the current Ōmaha Bay, Kawau Bay, and Whangaparāoa Peninsula temporary closures, Bay of Islands rāhui, and the Aotea/Great Barrier rāhui tapū. Click any area for details including species restrictions, gazette references, and expiry dates.
Priority Zones
Risk-based surveillance priority zones derived from the national Caulerpa prioritisation framework. Each zone is scored across four weighted dimensions — introduction risk, environmental suitability, proximity to known infestations, and economic/social consequence — with override rules for culturally significant and protected areas.
- Red dashed — High priority (score 34–45). Highest vessel traffic, confirmed infestations, or protected area overrides.
- Amber dashed — Medium priority (score 22–33). Good habitat and moderate risk factors, or elevated by iwi/protected status.
- Grey dashed — Low priority (score <22). Comparative reference zones with lower suitability.
Click any zone to see its full score breakdown, override rationale, key risk factors, and known infestations. Zones use dashed borders and low-opacity fills so underlying regulatory and sighting layers remain visible.
Other Layers
- Coastal Names — place names for coastal features, bays, and headlands.
- WMP Sightings — confirmed Caulerpa sightings from the Weed Management Programme.
- iNaturalist Caulerpa — Caulerpa observations from iNaturalist NZ, colour-coded red for exotic species and purple for native. Click for species, photo, date, and a link to iNaturalist. Updated weekly.
- Community Sightings — Caulerpa observations reported through the community sighting viewer.
- LINZ Aerial (NZ) — high-resolution aerial imagery from Land Information New Zealand.
- Nautical Chart — OpenSeaMap navigation marks and depth data.
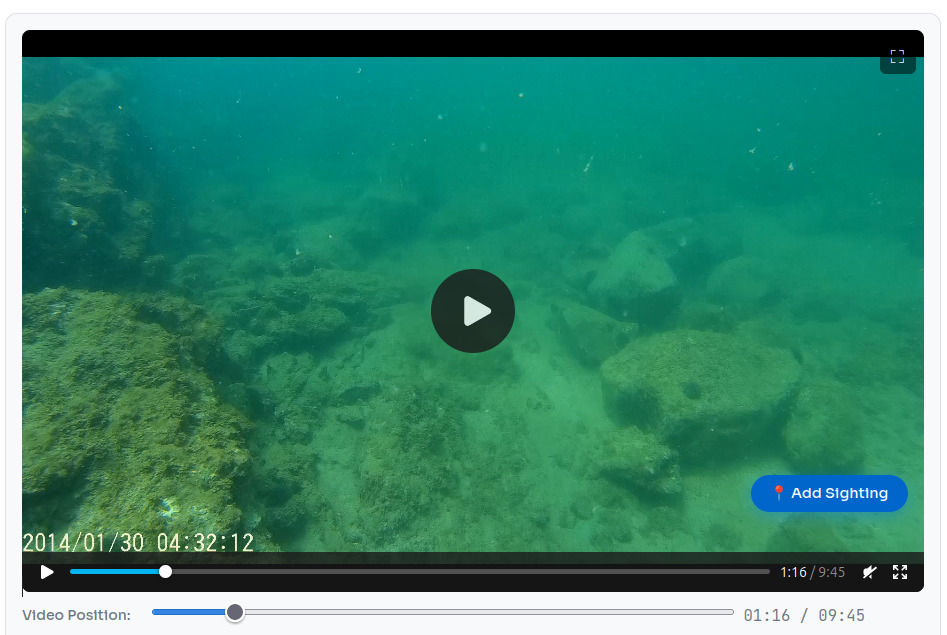
4. Log Sightings
When you spot something, press S on the keyboard or click Add Sighting (or use the floating button in fullscreen mode). A frame is captured automatically. Fill in the details — name, notes, biota type, density, and benthic description.
Manual sightings: if you don't have a video frame to capture from (e.g. a sighting noted on a separate camera, a phone snap, or a position you only logged on paper), right-click anywhere on the map and choose Add Manual Sighting. The modal opens pre-filled with the click coordinates, lets you edit the lat/lon directly, and offers a Choose Photo (optional) tile so you can attach an image from disk. The saved sighting behaves identically to a video-derived one — same map marker, same Sightings tab entry, same archive ZIP and report inclusion.
Sightings appear in the list and as markers on the map. If you've defined transects, sightings will automatically assign to the correct one based on their timestamp. Timeline ticks let you jump back to any sighting instantly, and you can click the edit button or open the image lightbox to update details at any time. Right-click any sighting marker on the map for an Edit Sighting / Delete Sighting context menu — the same actions as the ✎/× buttons in the Sightings tab.
If a sighting has the wrong image, or no image yet, open the sighting image/lightbox and use Add Photo / Replace Photo to choose an image from disk, or Add Frame / Replace Frame to capture the current frame from the loaded video. Frame replacement works best when the correct video is loaded and synced to the sighting time.
Image enhancement: the sighting modal and image lightbox include enhancement controls for underwater frames. Click the sighting preview to inspect the larger image, then use a preset as a starting point. Presets only load slider values; they do not apply the filter by themselves. Tick Auto enhance image to preview and save the current slider settings, and untick it to compare against the original image.
A practical workflow is: start with Natural for a mild correction or Green water for green/turbid footage, tick the checkbox to preview, then adjust sliders gently. Brightness fixes dark or washed-out frames, Contrast makes features stand out, Saturation controls colour strength, White balance warms or cools the image, Fake red rebuilds lost underwater red, Dehaze reduces water-column veil, Clarity boosts local texture, and Sharpen crisps fine edges. Avoid pushing Fake red, Dehaze, Clarity, or Sharpen too far — they can make sand pink, edges harsh, or noise more obvious.
When you tune a photo manually, the sliders remember those settings for the next photo. Save turns the apply checkbox off for the just-saved image so it is not enhanced twice, but your slider values stay ready for the next sighting. Click another preset only when you want a new starting point.
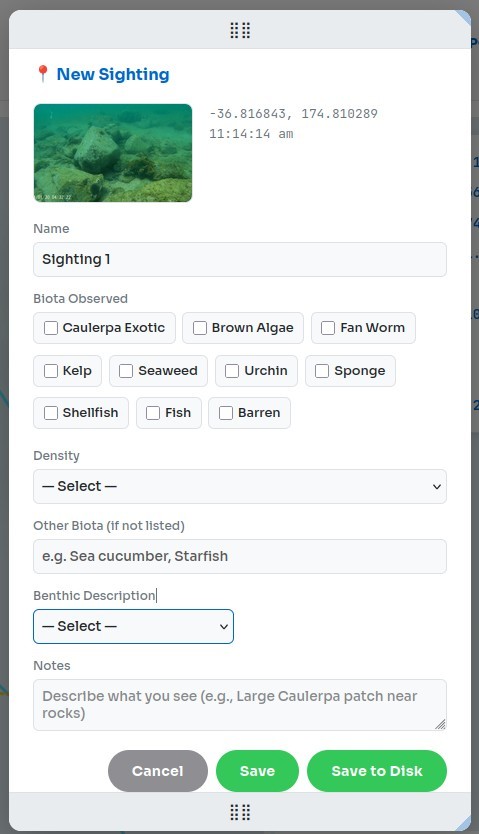
The sighting modal — captured frame, biota type, density, benthic, and notes.
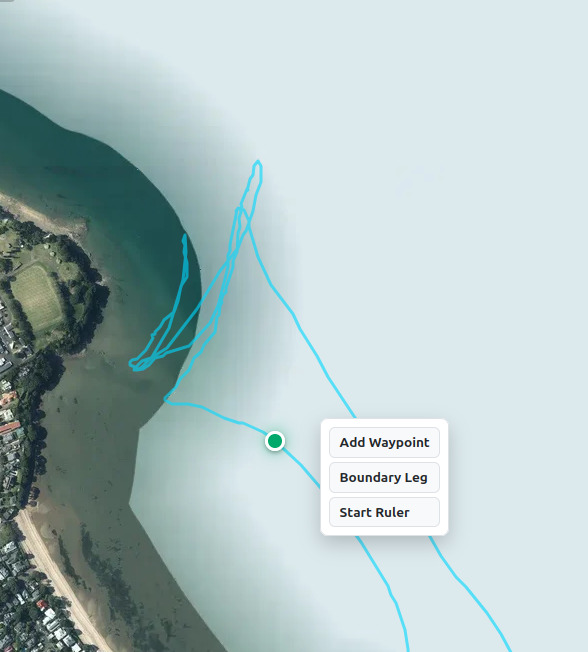
5. Waypoints, Boundaries & Ruler
The map has a right-click context menu that changes depending on what you click — the map, a waypoint, or the track cursor. These tools let you annotate your survey with spatial detail that carries through to the final report.
Waypoints
Right-click the map and choose Add Waypoint to drop a labelled marker. You can drag waypoints to reposition them, and right-click a waypoint to delete it. Waypoints are included in the saved GPX and in every report with NZTM coordinates.
Boundary Areas
Boundaries let you outline areas of interest — like a caulerpa patch or a reef edge. Right-click and choose Boundary Leg to start drawing. The cursor becomes a crosshair and a dotted yellow preview line follows the mouse. Left-click to place each vertex. Vertices will snap to nearby waypoints or existing boundary points automatically. Right-click to finish, or press Escape to cancel. To close a polygon, drop the last vertex on the first one — they will snap together. After drawing, every yellow vertex is draggable: grab one to reshape the polygon, and drop a vertex within ~12 m of another to merge them. The area is calculated and shown below the map.

Boundary areas outlined on the map with named labels and area measurements.
Click on a boundary line to delete the nearest vertex. Right-click and choose Clear Boundary to remove all boundaries. If a boundary leg is attached to a waypoint, the boundary moves with the waypoint when you drag it.
Ruler
Right-click the map and choose Start Ruler to place the first point, then right-click again and choose Add Ruler Point to place the second. A dashed yellow line appears with the distance and heading shown below the map. Drag the markers to adjust. Click the ruler line to clear and start over.
Track Trimming
If your GPX has unwanted data before or after the survey, right-click the cursor marker (the green dot on the track) and choose Trim Track Before Cursor or Trim Track After Cursor. Trimming is blocked if any sightings or transects would be lost — you'll need to remove them first.
Map-Only Live Position
In map-only mode, you can enable Show Live Position to place a blue GPS marker on the map using your phone or tablet's current browser location. This is useful when returning to a previously logged sighting, waypoint, or point on the survey track.
Once the blue Live Position marker is showing, right-click a sighting, waypoint, or the green track cursor and choose Navigate To Here. The viewer draws a dotted blue line from your live position to the selected target. Use Clear Navigation to remove the current route.
On mobile, the Survey panel opens from a short left-edge drawer tab and supports edge-swipe opening without taking over the whole map. If you record a track from the phone and pause it, use Share Survey to create the normal shared-survey ZIP/link. If a main GPX is already loaded, the mobile-recorded track is exported as an overlay instead of replacing the active GPX.
6. Fill in Survey Info
The Survey Info tab captures your agency, survey name, method, site code, date, operator details, and water temperatures. This metadata travels with every report you send so agencies know exactly what they're looking at.
7. Report & Share
The Reporting tab is where you package and send your survey. Local backups:
- Save GPX — downloads an updated GPX with all your waypoints, transects, boundaries, ruler, overlays, and metadata.
- Save Survey — creates a local ZIP backup using the same manifest-based survey structure as shared surveys. Local ZIPs include the GPX, sidecar JSON, overlays, notes, and images you have loaded or captured, but do not include the agent-generated PDF/Excel files.
Pick a Survey reporting format — this is what the agent produces and sends back:
- Full ZIP (default) — cover PDF, Excel workbook, sightings CSV, GPX, and all sighting images. Best for archive/handover.
- PDF report only — just the cover PDF.
- Excel workbook only — just the .xlsx data sheets.
- CSV only — just the sightings table.
- Share link — uploads a lightweight survey snapshot to the agent and gives you a copy-able URL or QR code. Anyone with the link can open the survey in their own viewer (no video). The snapshot includes sightings, waypoints, boundaries, rulers, transects, overlay GPX files, overlay notes/display settings, and sync metadata for loaded videos. Choose an expiry (1 hour / 1 day / 7 days / 30 days) and tick "Include sighting images" if you want them embedded. Each click of Create Share Link creates a brand-new link — old links remain valid until they expire.
For PDF / Excel / CSV / Full ZIP, also tick where you want it delivered:
- Download to this session — saves the file in your browser.
- Email to operator / Email to address below — sends as an attachment.
- Submit for AI Training — uploads the raw data to AAT (always uses the Full ZIP format; auto-disabled for single-file formats).
- Send to Dropcam Surveys — also publishes your survey to the public Dropcam Surveys map (see the section below).
Run AI Object Detection annotates your sighting images with detected species before packaging. Skipped automatically for Share links so they stay fast.
Hit Send Report (or Create Share Link in share mode) when ready.
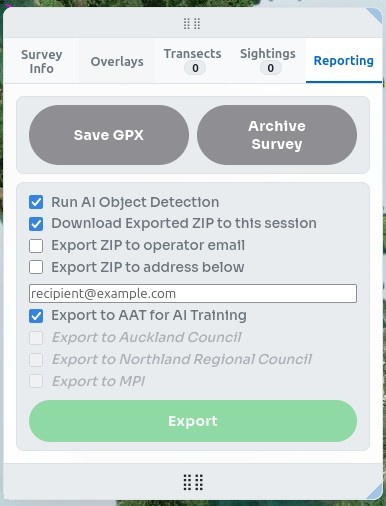
The Reporting tab — pick a format, pick destinations, then Send Report.
Dropcam Surveys — the public catalogue
Dropcam Surveys is a community map of approved surveys you can browse straight from the viewer. Toggle the Dropcam Surveys layer in the layer control (top-right of the map) and approved surveys appear as colour-coded centroid dots:
- Red — admin marked the survey as a positive Caulerpa sighting.
- Green — negative: clean seabed.
- Orange — pending admin review.
The outer ring shows lifetime progress — it starts white when newly published and fills with black as the survey ages toward its expiry. A mostly-black ring means the survey is close to expiring.
Hover a centroid for survey metadata (title, agency, date, sighting count, public reference like
DCS-000001). Click to load the full survey in place — track (dashed light line),
transect segments (dotted green), transect start/end markers (red ▲ / blue ■), and clickable sighting markers.
Clicking the same dot again unloads it. Loaded survey sighting dots are drawn smaller than the centroid dot so you can distinguish the survey summary point from its individual observations.
Hover any sighting marker for a thumbnail + notes preview. Click to open the full lightbox — use the ‹ › arrows or ← / → keys to cycle through every image in the survey.
Publishing your own survey to Dropcam Surveys
In the Reporting tab, tick Send to Dropcam Surveys alongside your other destinations. A small panel opens asking how long the survey should remain on the public map: 1, 2, or 3 years. Operator email is required — that's where your management reference is sent.
When you press Send Report, the survey is queued for admin review. Once an admin approves it, the centroid dot appears on the public map for everyone who has the layer enabled.
Your management reference
The thank-you email contains a one-time management reference (a UUID like
cba9eaaf-6f0b-4257-807a-c3f863af14bb). Keep it safe — anyone holding it can manage the survey.
We do not store it anywhere except in that email; if you lose it, contact AAT NZ.
The reference is deliberately never put in a URL so it doesn't end up in browser history, proxy logs, or third-party analytics.
Managing a published survey
Open the viewer and click Manage published survey on the upload screen. Paste the reference and you can:
- Change the public years — adjust between 1 / 2 / 3 years; the expiry date recalculates from your original publish date.
- Reset to original — restore the years value you chose at submission.
- Hide / show submitter details — toggle whether your operator name and email appear in admin records.
- Unpublish — remove the survey from the public map (admins can still see it).
- Republish — bring an unpublished survey back to the public map.
- Administrator conversation — read admin requests and send replies from the same management panel if more information or changes are needed.
Every action is recorded in the survey's audit log so admins can see what happened and when.
Loading a shared survey
If someone has emailed you a share link or just the reference token, you have two ways to open it:
- Click the share URL — the viewer auto-loads the bundle in map-only mode.
- From the upload screen, click Load shared survey and paste either the full URL
(
https://dropcam.aat.nz/?share=…) or just the bare reference token. The viewer accepts either format. - On supported devices, use the scan button in the Load shared survey dialog to scan the share QR code with the camera.
Share bundles include the GPX, sightings, waypoints, transects, boundaries, rulers, overlay GPX files, and (if the sender enabled it) sighting images. They expire on the schedule chosen at creation (1 hour / 1 day / 7 days / 30 days).
Keyboard Shortcuts
| Key | Action |
|---|---|
| S | Add sighting — captures the current video frame and opens the sighting modal. |
| Escape | Cancel boundary drawing if in progress, or close the image lightbox. |
| ← / → | (Image lightbox open) Cycle through every sighting image in the survey. Zoom level persists between images. |
Right-Click Menu
The context menu is the main way to interact with the map. It adapts based on exactly what you right-click — the open map, a waypoint marker, a boundary label, a boundary line, or the track cursor. Only the actions that make sense in that context are shown, so the menu stays clean and uncluttered.
The context menu adapts to show only relevant actions for what you clicked.
On the Map (open area)
- Start Transect — begins a new transect at the clicked location. The Start button in the panel turns green.
- End Transect — finishes the active transect at the clicked location (visible only when a transect is in progress).
- Add Waypoint — drops a labelled waypoint marker you can drag to reposition. Included in the saved GPX and every report with NZTM coordinates.
- Add Manual Sighting — opens the sighting modal pre-filled with the click coordinates. Use this when you don't have a video frame to capture from. Edit the lat/lon directly, attach a photo from disk via the Choose Photo (optional) tile, fill in the usual sighting fields, and Save. Behaves identically to a video-derived sighting once saved.
- Boundary Leg — starts drawing a new boundary polygon from the clicked point. The cursor becomes a crosshair and a preview line follows your mouse. Left-click to place each vertex; right-click or press Escape to finish. To close, drop the last vertex on the first one. Existing vertices are also draggable for reshaping.
- Delete Boundary Leg — removes the nearest boundary leg (line segment) to where you clicked.
- Delete All Boundaries — clears all boundary polygons from the map.
- Start Ruler — places the first ruler point. Right-click again and choose Add Ruler Point to complete the measurement. Distance and bearing are shown below the map. Drag either marker to adjust.
- Add Ruler Point — adds the next ruler point (visible after Start Ruler has been used). Multiple points create a multi-segment ruler with a total distance.
- Delete Ruler — removes the ruler line and markers.
On a Waypoint
- Rename Waypoint — opens a prompt to give the waypoint a custom name. The label updates immediately on the map and in any report you generate.
- Delete Waypoint — removes the waypoint. Any boundary vertices attached to it are also removed.
- Boundary Leg — starts a new boundary polygon snapped to the waypoint's exact location.
- Start Ruler — begins a ruler measurement from the waypoint's location.
- Navigate To Here — in map-only mode with Show Live Position enabled, draws a dotted blue line from your live GPS position to this waypoint.
On a Sighting
- Edit Sighting — opens the sighting modal so you can update the name, biota, density, benthic description, notes, lat/lon (manual sightings), or attached photo. You can add/replace the photo from disk or capture/replace it from the current video frame. Same dialog as the ✎ button in the Sightings tab.
- Delete Sighting — removes the sighting after a confirmation prompt. Same action as the × button in the Sightings tab.
- Navigate To Here — in map-only mode with Show Live Position enabled, draws a dotted blue line from your live GPS position to this sighting.
On a Boundary Area Label
- Rename Area — opens a prompt to give the boundary a custom name (e.g. "Caulerpa Patch A", "Survey Zone 1"). Names appear on the map label and in the generated report.
- Delete Area — removes that individual boundary polygon.
On a Boundary Line
- Rename Area — available from the boundary line as well as the label.
- Delete Area — removes that individual boundary polygon.
- Delete Boundary Leg — removes the nearest boundary line segment while keeping the rest of the boundary where possible.
On the Track Cursor
Right-click the green cursor marker that follows the GPS track as video plays.
- Start Transect — starts a new transect at the cursor's current position on the track.
- End Transect — ends the active transect at the cursor's position.
- Navigate To Here — in map-only mode with Show Live Position enabled, draws a dotted blue line from your live GPS position to the cursor's current track position.
- Trim Track Before Cursor — removes all track points before the cursor. Useful for cleaning up GPS data recorded before you arrived at the site. Blocked if sightings or transects would be lost.
- Trim Track After Cursor — removes all track points after the cursor. Useful if GPS kept recording after the survey ended. Blocked if sightings or transects would be lost.
While Live Navigation Is Active
- Clear Navigation — removes the current dotted blue route from the live position marker to the selected target.
AI Object Detection
In the Reporting tab, enable the Object Detection toggle before submitting. Your sighting images will be run through the AI model during processing — detections are drawn on the images and summarised in the Excel report and cover PDF.
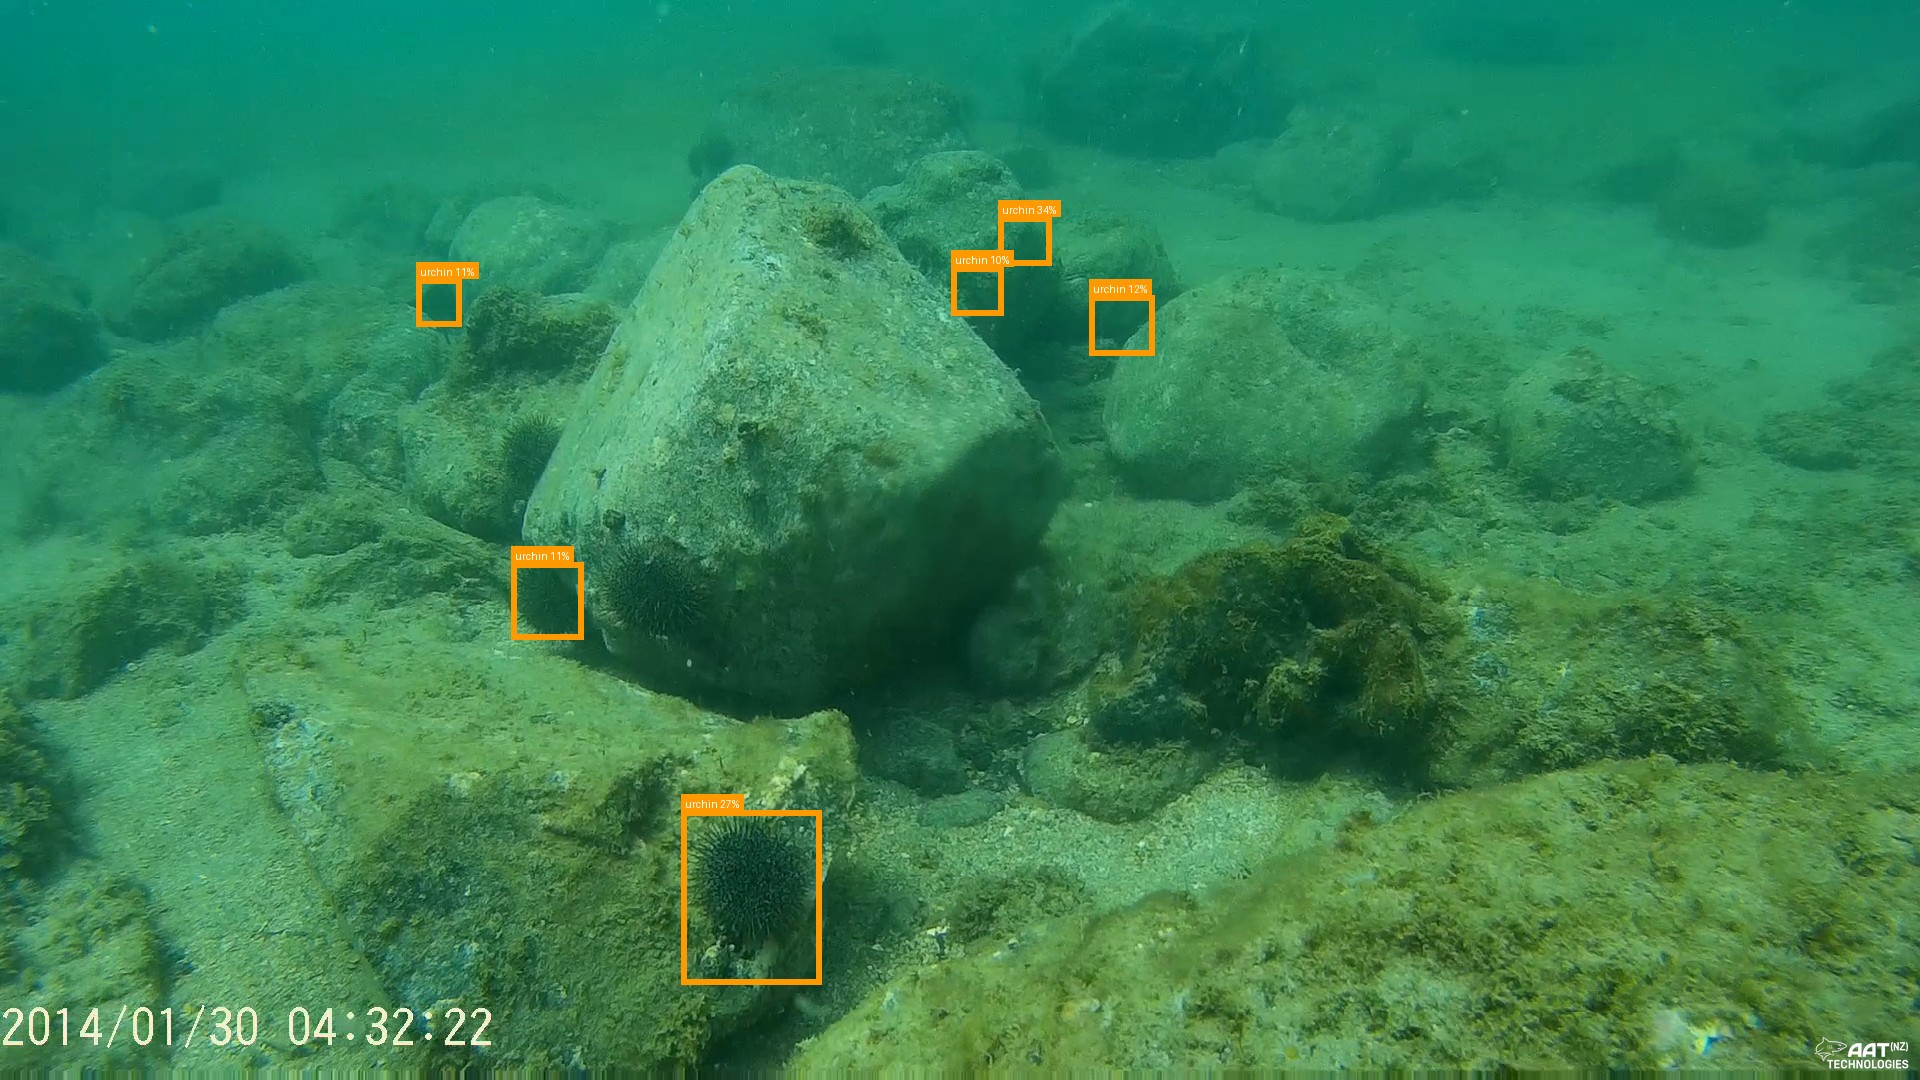
AI detection in action — bounding boxes drawn around identified objects.
Data & Privacy
Your video and GPX files never leave your computer until you choose to send a report or create a share link. See the landing page for our full privacy statement.
Tips for Good Surveys
Before You Go
- Charge everything — phone, camera, spare batteries.
- Make sure your GPS app is recording before you start video.
- Sync your camera clock as close to your phone time as possible.
- Clear enough storage for continuous video.
- Clean the lens well.
During the Survey
- Keep GPS running the entire time — don't stop until you're done.
- Go slow — around 0.5 km/h is ideal for review. Pause occasionally to get a clear frame. Try to keep the camera directly below you — if it's out the back, it's now a towcam and you're travelling too fast.
- Take a slow video pan of your surroundings at the start and finish of each drop, and make mental notes of landmarks — they help with syncing later.
- If practical, film your phone screen for a few seconds before the drop so you can verify the time stamp, including the seconds count, during review.
- DJI footage can be useful for aerial surveys, especially on coastlines.
- The system also works well for diver and snorkeller surveys where the diver records the video and the mobile phone or GPS recording stays in a float boat directly above them.
- Shoreline surveys above water can also be recorded in the same system for logging sightings.
Example dropcam footage — clear view of the seabed with good visibility.
Documenting Sightings
Good notes make a real difference. Be specific about what you see:
- Size and extent of the patch
- Density — none, possible, sparse, moderate, or dense
- What the seabed looks like — sand, rock, mud, mixed
- Nearby features — moorings, structures, channel edges
Troubleshooting
| Problem | What to Check |
|---|---|
| Map doesn't move with video | Make sure you've clicked Sync & Play and that the video start time is correct. |
| GPS position is way off | Click Resync, adjust the start time, and sync again. |
| Video won't play | Check the format — MP4, WebM, and MOV are supported. Try converting with VLC if needed. |
| GPX file won't load | Confirm it's a .gpx file, not KML or another format. |
| SRT file won't load or shows no track | Confirm the SRT is from a DJI drone and contains embedded telemetry (latitude, longitude, abs_alt lines inside each subtitle block). SRT files from non-DJI cameras or subtitle-only files won't work. |
| Send Report button disabled | You need a GPX loaded, at least one sighting, Survey Name and Site Code filled in, and images loaded for sightings. (Share Link mode is more lenient — it just needs the agent online.) |
| Agent shows offline | Check the status dot in the viewer header. The agent may be temporarily unavailable. |
Sharing Your Survey
Your reported data helps the people and organisations working to protect our marine environments:
- Our kids and future generations — so they inherit healthy coastlines and thriving ecosystems.
- Our native marine animals, critters, plants, and natural environment — every sighting contributes to their protection.
- Ministry for Primary Industries (MPI) — national biosecurity tracking and eradication coordination.
- Regional Councils — local monitoring, management planning, and resource allocation.
- Iwi and hapū — protecting mahinga kai, traditional fishing grounds, and sites of cultural significance.
- Community groups — citizen science programmes, local monitoring, and awareness.
What's Ahead
This project is a living thing — it grows as the community's needs grow. Here's what we're working towards: